How to Schedule a Blog Post in Squarespace
Scheduling a blog post helps you save time besides keeping your blog regularly updated. See how to schedule a blog post in Squarespace.
Squarespace is a popular platform for creating blogs, websites, and online stores. One of the great features of Squarespace is the ability to schedule blog posts.
This allows you to write and prepare your blog posts in advance and have them published on a specific date and time. In this step-by-step guide, we will show you how to schedule a blog post in Squarespace.
How to Schedule a Blog Post in Squarespace
To schedule a blog post in Squarespace, click on “Done” button from the top left. Then select the “Schedule” option and a popup will open. Choose the date and time when you want the post to be published click “Schedule” to schedule the post.
See the following step by step guide below.
Step 1: Log in to your Squarespace Account
Go to the Squarespace homepage and log in to your account. If you have multiple sites, select the site where you want to schedule a blog post.
Step 2: Create a New Blog Post
To create a new blog post, click on the Pages option from the left main menu and select Blog. Click on the + icon to add a new blog post.
Step 3: Write Your Blog Post
Write your blog post as usual, and include any images or media you want to include. Once you have completed writing your post and are ready to publish it, you can schedule this post now. Follow the step 4.
Step 4: Schedule Your Blog Post
To schedule you blog post, click “Done” from the top left and click the “Schedule” option. Then select date and time you want your post to be published.
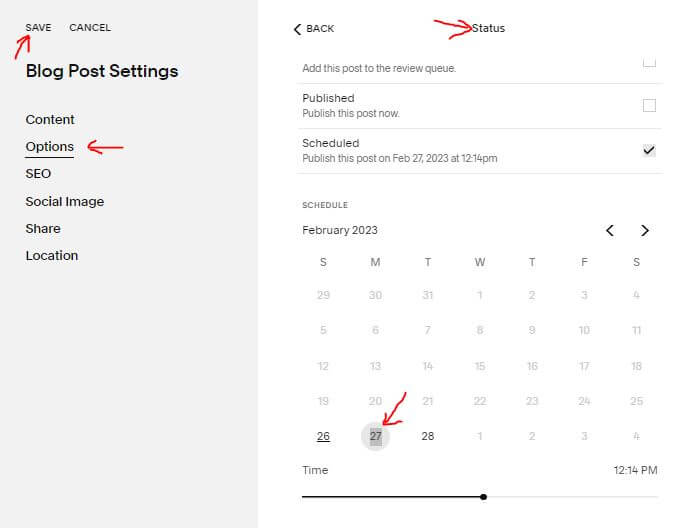
You can also set a scheduled time, by clicking on Date over the post title from the post editor. Click the date over post title. Then click “Options” tab, then click “Status” and select the “Scheduled” option. Choose the date and time when the post should be published. Finally, click SAVE button from the top left.
Step 5: Preview and Publish Your Blog Post
After scheduling your blog post, you can preview it by clicking on the “Preview” button. Once you are happy with the preview, click on the “Publish” button to schedule your post.
Your blog post will now be scheduled to be published on the date and time you selected. You can view your scheduled posts by going to the Blog page and clicking on the “Scheduled” tab.
In conclusion, scheduling a blog post in Squarespace is a simple process that can save you time and effort. By following these easy steps, you can create and schedule blog posts in advance, ensuring that your blog is always up-to-date with fresh content.